Some better photos of the final guitar ...
You're welcome to leave comments for any of the posts (click on the little pencil icon at the end of a post), or contact me directly at tonysguitarblog@googlemail.com
Thursday, March 27, 2008
Tuesday, March 25, 2008
It's All Over ..
The 5 days are at an end. Which is lucky, because I'm about as tired as I can get ...
With apologies for the poor photo, this is what it's all been about:
The photo really doesn't do justice to the quality of the guitar or the beauty of the wood.
And it's finished, and it all works, and it's all just about perfect. Which makes me just a little happy.
An exhausting 5 days, with lots of highs, I don't remember any lows, and a great guitar at the end of it. In fact, 4 great (and very different) guitars produced by the 4 of us, with Mark's patient guidance throughout. I'm not quite sure how he does it, stays sane, and good-humoured throughout.
We're all just out of the workshop, and I should really be cuddling my new baby, rather than typing on a laptop. 7-8 hours of tomorrow will be spent driving home, so the next update (with a series of better photos) will be on Thursday.
Thanks all for reading - hope its been fun.
Monday, March 24, 2008
The sealer coat ...
Out of the glue shop
The guitar and neck are now irrevocably (I hope) joined ...
The guitar (and neck) are now in the sprayshop, receiving a clear laquered finish. Might get to see it later tonight, or it may be tomorrow morning ...
Tomorrow is day 5 in the 5 day project. The morning will be spent on the frets - levelling and dressing, cleaning and oiling the fretboard, fitting the hardware, setting-up and finally ....
PLUGGING IN !
Tomorrow is the day of big smiles :-)
Day 4 - Interim Update
It might be cold, dark and windy outside (that's usual for Scotland apparently), but we're not finished yet. Taking a quick break for some food, before back to the workshop. Whilst we eat, the glue binding the neck to the body will set, and we can complete the final few steps before spraying.
So, this is an interim update, with more to follow later. Probably much later.
The day began here. One body and a pencil ... where shall I carve?
A few hours later, and I'd done some carving. Usually, when sharp tools are brought into contact with wood, the wood suffers. However, this piece of Amazique didn't go quietly, quickly or easily. There are some blunt tools in the workshop, and some aching muscles in my arms.
A few hours later, and we're getting there now, much oh so much more to do ...
Today I probably spent 5-6 hours on the body, and a 2-3 working on the neck. It should all be worthwhile tomorrow when the body gets fitted with the hardware and I do something called "plugging it in".
I forgot to take a pic of the guitar with the finished carved top before I glued the neck in.
And I forgot to take a pic of the guitar with the neck glued in before we stopped ...
So, more photos later this evening when the glue has set - check back later!
Sunday, March 23, 2008
Late Update
Bit of a late update tonight - because the working days are getting longer! Tomorrow's update could be even later ... but might just include a photo of the sprayed body ...
First things first ... the cap and body joined together overnight, with the help of a lot of glue, and a lot of clamps. Here's the finished product - and you can see what the joined cap might look like.
Plenty of time today spent on the neck - the front of the neck today, getting it properly levelled, the fret slots cleaned out, the frets cut, pre-bent, and placed gently in position. With a hammer. After that, all those sharp edges have to be removed with a file. After the photo below, the side dots were put in place. Drilling a 2mm hole in the side of a fretboard which is only 5mm wide is not a task to be done with eyes closed ... there's not a lot of margin for error!
But if - theoretically, hypothetically, and just supposing - an error was made, I do know a fix.
Starting to mark up the body to work out where the hardware will be placed. At this stage, still undecided whether to use 3 of the single-coil-sized humbuckers, or 2 of them with a P90 in the neck position. Oh, and you can see the bridge in this shot too. Don't worry, the scratchplate was just used for a rough idea of positioning, there's no way I'm putting a scratchplate on this body.
And this is why there'll be no scratchplate on this body ... would you want to hide any of this beautiful wood? Here's the body, after it spent a few minutes being bandsawn, and then a few more minutes with the router cutting the edge properly.
You can also see the pickup positions routed out, from which you will see that the final decision has been made - the P90 is heading for the neck position.
And finally for today - the neck pocket has been routed, and the neck accurately placed into position - either that or shoved with brute force into the pocket ...
Tomorrow, the day will start with carving the body, will progress into planing the body, and will end (fairly late) with sanding the body. It will then go into the spray shop.
Tune in tomorrow for the next exciting installment ...
Saturday, March 22, 2008
Day 2 is about the neck ...
This is where the day began - the fretboard slotted and glued to the neck, but no other work finished on it ... yet ...
A couple of hours later, and the marker dots have been glued in to the fretboard, the fretboard has been levelled (for the first of many times) and radiused. As you can see - 22 frets (and it's a 25" scale length). At this stage, the neck hasn't been shaped at all - it's still just a solid block.
But it won't be a solid block for too much longer. Here it's been marked to show where the initial shaping will aim for.
Last year, attacking my neck with a rasp was a fairly scary experience. This year it was less scary, but still seems to be inconsistent that a thing of such sensitivity (ie the back of the neck) is created from such brute force attack as ripping the wood to shreds with the rasp!
The photo angle doesn't show it too well, but after about an hour (quick!) the neck is starting to take shape ...
The cap is now glued together (getting that glue joint took a while too!), and just placed on the body to check for size, orientation and broad fit ...
And after dry clamping it full to check for any gaps between the body and the cap, the glue is applied (liberally) and the clamps re-applied - tightly.
By the time we start work in the morning, the cap and the body will be joined and ready for some attention with the bandsaw and a router ...
Friday, March 21, 2008
20% Done
Well, nearly all over then, really. Almost finished. Be time to plug in and play soon .. ;-)
20% done - in that we've finished day 1 of 5. And achieved quite a lot of the basic works. The bits of the project that make the difference between an OK guitar, and a great guitar.
We'd got a bit of a headstart today in that we'd picked the pieces of wood, and planed and thicknessed it yesterda, before the course had really begun. So today began with cutting the slot for the truss rod.
Not too difficult a task, once you've measured it accurately, set-up the router properly, and measured it all again, just to make sure. Same approach with the cutting the fretboard slots (measure, set-up, check), made hugely easier and quicker with the table saw jig, which should not be confused with a "table jig saw".
So now we have a neck blank, with truss rod channel cut, and a fretboard roughly radiused with fret slots cut. This was achieved before lunchtime on day 1.
Getting to the stage shown in the next picture took a while ...
This photo shows the two pieces of the body, glued together and sash clamped to set overnight. Getting to this stage took - seriously - perhaps 2-3 hours. That time was spent in preparing the edges to be joined. The wood had been prepared on the planer, and you might assume that the planer left a good straight and flat edge, suitable for glueing.
Oh no. Working in the Bailey workshop, there is no concept of "good enough" or "near enough" or "that'll do". It's either right, or it's not. And if it's not, then you might spend the next 2-3 hours (or longer if necessary) getting it right. That's why the guitars that come out of Mark's workshop are great guitars rather than just being OK guitars - even if it's one that I've made. And that's why it took 2-3 hours preparing 2 pieces of wood to be joined together.
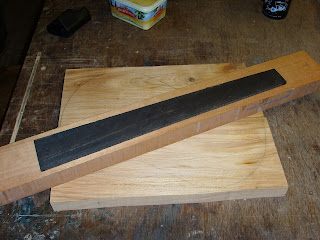
Final job of the day was to glue the fretboard to the neck. Before this can be done, the truss rod has to be covered with a thin wood fillet glued into the top of the truss rod slot. This then has to be planed level and then sanded until it is right (see above). Once it's right, then the fretboard can be glued on, clamped and left to set overnight.
Whilst all that glue is setting, I'm settling with a beer or two. Apparently today was a fairly short day - into the workshop at 09:30, and out by 20:00. Tomorrow will probably be longer ...
20% done - in that we've finished day 1 of 5. And achieved quite a lot of the basic works. The bits of the project that make the difference between an OK guitar, and a great guitar.
We'd got a bit of a headstart today in that we'd picked the pieces of wood, and planed and thicknessed it yesterda, before the course had really begun. So today began with cutting the slot for the truss rod.
Not too difficult a task, once you've measured it accurately, set-up the router properly, and measured it all again, just to make sure. Same approach with the cutting the fretboard slots (measure, set-up, check), made hugely easier and quicker with the table saw jig, which should not be confused with a "table jig saw".
So now we have a neck blank, with truss rod channel cut, and a fretboard roughly radiused with fret slots cut. This was achieved before lunchtime on day 1.
Getting to the stage shown in the next picture took a while ...
This photo shows the two pieces of the body, glued together and sash clamped to set overnight. Getting to this stage took - seriously - perhaps 2-3 hours. That time was spent in preparing the edges to be joined. The wood had been prepared on the planer, and you might assume that the planer left a good straight and flat edge, suitable for glueing.
Oh no. Working in the Bailey workshop, there is no concept of "good enough" or "near enough" or "that'll do". It's either right, or it's not. And if it's not, then you might spend the next 2-3 hours (or longer if necessary) getting it right. That's why the guitars that come out of Mark's workshop are great guitars rather than just being OK guitars - even if it's one that I've made. And that's why it took 2-3 hours preparing 2 pieces of wood to be joined together.
Final job of the day was to glue the fretboard to the neck. Before this can be done, the truss rod has to be covered with a thin wood fillet glued into the top of the truss rod slot. This then has to be planed level and then sanded until it is right (see above). Once it's right, then the fretboard can be glued on, clamped and left to set overnight.
Whilst all that glue is setting, I'm settling with a beer or two. Apparently today was a fairly short day - into the workshop at 09:30, and out by 20:00. Tomorrow will probably be longer ...
Thursday, March 20, 2008
I'm not alone ...
It's not just me on this course ...
Andy will create a Vox teardrop styled guitar, all mahogany with ebony fingerboard, and rubber (so he says) tuners ... that's if he gets his feet away from the log fire and into the workshop ...
Edwin is building another Tele - birdseye maple cap and neck on a mahogany body. This is Edwin's second time on the course, but won't be just his second self-made guitar.
Ton is making a solid mahogany Les Paul - alike ... this course is his surprise "30th" birthday present from his family - I believe him about the birthday present bit, and about it being a surprise ... but maybe they count differently in Holland ;-)
I'll grab some pictures from all 4 builds during the next 5 days, and post them here.
Time to Start
Let the build begin!
Step 1 is to choose the woods, and do the initial preparation. So here are a few pieces of mahogany (2 pieces to be joined for the body, plus another piece of mahogany for the neck) plus a piece of ebony for the fingerboard. The ebony has an interesting bit of colour variation in it, which doesn't really show up in the photos below ...
My original plan was to use a maple cap, but then I saw this in the woodstore. Again, the photo doesn't really do justice to the beauty of the wood, and it's also completely untreated at the moment ... so my expectations are high for the finished cap ...
It's bookmatched Amazique. It's around 12mm thick, so plenty of scope for some carving.
This evening, the body pieces have been thicknessed (down to 38mm), and the neck blank has been sanded and planed. First job tomorrow will be to get the body pieces glued together, and possibly get the cap glued on too.
The build has started !!!
Wednesday, March 19, 2008
Decisions, decisions, decisions
Normally I can make decisions. Decisions like "Pick A or B". "Buy 1 or 2". "Do we do it; Yes or No". I can make those decisions all day long.
But this decision is causing me to lay awake at nights (ok, only briefly!) and to spend hour after hour flicking through the pile of guitar magazines yet one more time, looking for inspiration.
There are 24 hours left for me to decide WHAT I'M GOING TO MAKE. Is it to be the PRS-alike (is that shape just too popular now?), or another wannabe KAWAI (But I've done that one already), or even a single-cutaway Les Paul shape (which is in a strong 3rd place on my alternatives list).
I think that the decision will be made tomorrow when I've finished in the wood store, looking through the stocks of body woods and caps. I want to try building with a body cap this time - to learn how it's done as much as any other reason, but I could use a cap on any of those body styles. I want to use the 3 pickups for the tonal variety, which probably points me towards the PRS shape (would a Les Paul body look "right" with the 3 pickups, a la Strat?).
I intend to post the starting pics (the pile of woods) here tomorrow evening, which will be the start of the 5 day course period. IF everything goes to plan, you'll see the guitar taking shape day-by-day ...
Tuesday, March 18, 2008
PickUps & Parts
These are the pickups that will be going into the guitar - a matched set of 3. They're single coil sized humbuckers.
Soundclips
Although I still haven't decided whether to mix them up with a P90 in the middle position. Using a standard 5 position selector switch and a coil tap (only working on the humbuckers!), the mixture might give an "interesting" range of sounds. I think it will be a last minute decision ...
I'm thinking "all black" for the rest of the hardware, for a visual contrast with a naturally finished maple body cap.
Sunday, March 16, 2008
To Kawai or not to Kawai?
My first self-build guitar was deliberately based on the body shape of the Kawai guitars from the late 70's - (the KS-10, KS-11-XL and KS-12-XL models). The Kawai was my first "real" guitar - too many years ago to remember exactly when. Those were great guitars, and I thought I'd base my first self-build on the Kawai design.
The materials were different (Ash instead of Mahogany), and I used a separate bridge and tailpiece in place of the single unit on the Kawai, but I get a similar sort of sound, thanks largely to the high output pick-ups. My self-build is a bit raw-sounding and louder than the Kawai, but I'm happy with the overall feel and weight. I wasn't brave enough to try to emulate the Kawai headstock design!
For this course, I think a different design and construction would be useful to broaden my skills (or at least to broaden my knowledge of the skills I need but don't yet possess!), although that Kawai body shape remains just about my favourite shape. The photos don't really do justice to the beautifully carved top on the guitars - I need to take better photos.
Friday, March 14, 2008
Current thoughts ...
As of today, I'm still at the stage of thinking about the design, the construction and the materials.
I *think* the build will be a traditional PRS-alike shape, using 3 single-coil-sized humbuckers. Body wood will be mahogany with a maple cap, and a maple neck with ebony fingerboard.
But then I could change my mind completely before the build starts ... that's all part of the fun.
I do have a P90 pickup sat here looking for a guitar ... so perhaps 2 of the humbuckers (neck and bridge positions) with the P90 in the middle ... perhaps!
Thursday, March 13, 2008
Preparing for the course
I'll be doing the course that runs over the Easter weekend - 21st-25th March 2008.
Last year, I posted progress updates on various guitar-related forums, and was amazed at the number of hits and comments that the posts generated. This year I've set-up this blog to publish the progress updates. My aim is to post updated pictures at the end of each working day. The days are long though, so don't expect updates at 5.01 each evening!
Last year I started with this pile of woods:
That's a piece of maple which became the neck (with an ebony fingerboard) and a piece of ash for the body.
5 days - about 50 working hours - later, I'd created the guitar pictured on the right.
When I say "I'd created", that's shorthand for "I did it, under the supervision, guidance and tutoring of a highly skilled luthier who's also a calm and patient teacher". Thanks Mark!
http://www.baileyguitars.co.uk/
Subscribe to:
Posts (Atom)