Great to open this month's copy of Guitarist magazine (#322, November 2009) to see the "my guitar is" feature on the letters page ...
The featured guitar was made by John Pollock on the Bailey build-your-own-guitar course at the end of August. I know John well, and I know how much he was both looking forward to, and fearing, the course - wondering whether his woodworking skills were quite up to the job of building a guitar. As you'll see if you read the magazine (or it's on page 9 if you need to find it quickly at a newsagents!), John's build turned out incredibly well, and he looks pretty pleased with it too.
The guitar to John's right - you can only see the headstock and first few frets - was actually made by my stepson who (obviously!) attended the same course. He was pretty pleased with his creation too.
Mark's course was how I started out on guitar-building a couple of years ago ... I still remember the incredible feeling of seeing something take shape before my eyes and under my hands - it really was one of my "life changing" events.
Friday, October 23, 2009
Sunday, September 20, 2009
Found another (couple of) Kawai guitars!
There will be more about this posted on my Kawai guitars site (http://www.kawaiguitars.com/) but I thought I'd add a quick post here as the blog as a different readership ...
I never thought that I'd find one of these anywhere


And the second acquisition is this Kawai Aquarius. Dates from the early 1980s ...

The twin humbuckers are coil-tapped via a push/pull on the tone knob. It's a nice enough guitar but isn't quite as "special" as the other Kawais. This one has been well cared for as there's barely a mark on it. I've seen a few for sale recently ... so I bought myself one to find out what they're like. I'll find out as soon as I put some strings on it!
I never thought that I'd find one of these anywhere

It' s a Kawai "Rock 'n' Roll Star". Dates from the late 1970s / early 1980s. I've never seen one before, and if I didn't happen to have copies of the Kawai guitar catalogues from the period, I'd never have known that it existed.
This guitar has had a bit of a hard, working, life, with plenty of scars, dings and dents. But the neck is undamaged and perfectly straight, and everything still works fine. It has the feature Kawai headstock (albeit a slightly damaged one) used on their guitars of that period.

And the second acquisition is this Kawai Aquarius. Dates from the early 1980s ...

The twin humbuckers are coil-tapped via a push/pull on the tone knob. It's a nice enough guitar but isn't quite as "special" as the other Kawais. This one has been well cared for as there's barely a mark on it. I've seen a few for sale recently ... so I bought myself one to find out what they're like. I'll find out as soon as I put some strings on it!
Monday, September 14, 2009
Another Kawai guitar ...
Ooops ... I think I just added another Kawai guitar to my little (but becoming bigger) collection. Details and pictures will follow when it arrives.
ps - don't tell anyone - especially my wife ;-)
ps - don't tell anyone - especially my wife ;-)
Thursday, September 3, 2009
Fretboard Radiusing
Usually, fretboard radiusing is done using a shaped radiusing block, a lot of sandpaper, and a lot of effort. It can easily take an hour or more to work on an unshaped fretboard blank.
A couple of months ago, I bought a router bit which had been designed specifically for fretboard radiusing:

 Now I just need to make 10 necks to glue the fretboards to!
A couple of months ago, I bought a router bit which had been designed specifically for fretboard radiusing:

The bit actually came from a workshop in Vietnam! After 90 mins of using it in the router table, I had 10 nicely radiused fretboards ...

Sunday, August 30, 2009
Blog Update
I've just added the Blogger "reaction" element to each post.
As you read the blog entries, please tick a category depending on whether the entry has been interesting (but not much else!), helpful to you in some way ("thanks"), or just a complete waste of time ("no thanks"!).
As you read the blog entries, please tick a category depending on whether the entry has been interesting (but not much else!), helpful to you in some way ("thanks"), or just a complete waste of time ("no thanks"!).
Saturday, August 22, 2009
Kawai Guitars - Rock'n'Roll Star
A quick update on my fascination (or obsession) with Kawai guitars. The website, cunningly called http://www.kawaiguitars.com/ has resulted in quite a few emails from other Kawai owners around the world, looking for info on their Kawai guitars. Some I can help, some I can't.
Last week I received an email from Toddy (bass player with BlondieUK) who was repairing a Kawai Rock'n'Roll Star. This model is basically a single cutaway acoustic with steel strings and a humbucking pickup. Apart from in the old Kawai guitar catalogues, I'd never seen one before. Apparently it's in a sad state with the finish flaking off, some additional holes drilled in the body, and generally needs some TLC. A lot of TLC.

Fingers crossed that it finds a good home!!
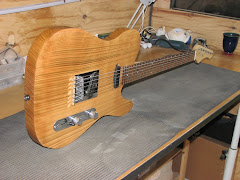
Sunday, August 16, 2009
It's done - new build your own guitar is finished
This one has had a bit of a troubled build ... it started as a simple, standard Tele-ish guitar with plain bi-coloured Ash body and a pre-made Warmoth birds-eye maple neck.


I didn't like it (I've gone off Teles I think) so I re-made it.
Carved the back, and the front of the body. Re-profiled the neck, taking about 3.5mm off the thickness. Stained the body, and then rubbed it all off, but left a "dirty grain" effect. Changed the neck pickup for an Iron Gear Jailhouse Rails, swapped the pick-up selector switch with a blend pot and added a coil split mini-toggle for the Jailhouse Rails.
This guitar now sounds amazing ... real powerful "oomph" from the Jailhouse Rails through to traditional Tele twang from the BKP "The Boss" pickup in the bridge position.
I shouldn't really say this (as I built it!), but I really like this guitar a lot ...
Guitar Tone?
As part of my learning curve (it's a long and steep curve, with no end in sight!) about building guitars, I've been reading a lot of "stuff" about how different woods affect the tone of a guitar.
And I'm sure that they're right - each piece of wood has its own unique characteristics, some of which will affect its tonal properties.
But - and this is my problem - there are so many other factors which affect how a guitar sounds, that I wonder how much the qualities of a piece of wood can really affect the sound that is eventually heard out of the amp's speakers?
I don't question that the acoustic sound of the guitar (and the sound of an acoustic guitar) will be affected by the quality of the wood, but the sound of an electric guitar is affected by so many other factors (such as the amp, speakers, pickups, etc, etc, etc) that I wonder whether the basic material is that critical?
And if not, does it really matter - purely from an outputted sound perspective - whether the guitarist is playing an original 57 Goldtop or an 09 Chinese Epi replica? Could they both be made to sound the same by tweaking the settings on the amp or fx boxes?
I started a discussion here (http://www.musicradar.com/forum/showthread.php?t=43989), but I'm not sure that there's an answer ...
Thursday, August 13, 2009
The truss rod slot
For me, building guitars is a great learning process, challenging, frustrating and satisfying in almost equal measure.
Yesterday was particularly satisfying ... there's something inexplicably pleasing about cutting a nice neat channel in a piece of wood.

Three necks, ready for truss rod insertions. From the left, that's mahogany, maple and a walnut/maple/walnut laminate.
See a perfect fit ...

Just need to get some silicone sealant to run inside the channel to stop any vibration/rattle, though I don't think that there's actually enough room in the slot for the truss rod to vibrate!
Almost seems a shame to cover that truss rod slot with a fretboard, but I think it might help playability if I do add the fretboard.
Monday, August 10, 2009
Staining the guitar body. Ooops.
Not my most successful weekend in the workshop. I decided to try to stain the newly shaped body. I'd sanded all the surface oil away, and used some wire wool and white spirit to try to penetrate a bit further into the body ... but judging by the splotchy staining effect, I didn't get all of the oil out of the wood.
So, out with the sandpaper again and remove the stain. A few hours and a bit of sweat later, and a not-unattractive (in my eyes) "dirty grain" effect is revealed. So, add a couple of coats of oil, and this is what I got ..

Staining the back of the body actually worked quite well - a good even effect, and the colour that I wanted. So I left that alone!
 My next task is to work out what to use as the cavity cover, and whether to use a scratchplate ...
But I learned a few things ... like stain before oil ...
Friday, August 7, 2009
Quite a lot of guitar building in the workshop
Having done the work on the guitar neck (see previous post), I decided to do some work on the body too.
The original guitar body was standard Tele - slab sided with no shaping/carving. Plus the cavity cover looked "like something you did in your shed" according to one on-line critic. As I pointed out, it was not created in my shed at all.
I did it in my workshop. But his point was right. This was the starting point ...

It was OK. It played OK, it sounded OK (BKPs!!), it looked OK. Ish. What's the point of making an OK guitar? So, time for some re-work.
The first task was to add a small belly carve. I the only person likely to ever play this guitar, so it obviously only needs a small carve to accommodate a small belly.
 And then for something a little more dramatic ... some edge carving to the top ...
 I used a router - freehand - to take about 3mm off the top of the body, in a curve more-or-less (I did say that it was freehand) matching the outline of the body. I then replaced the round-over, and spent a lot of time - a LOT of time - hand-sanding the ledge formed by the router to blend it into the rest of the body top.
That left a body with quite a thin waist ...
 And something looking fairly different to the original Tele body.
Next - how to finish it?
Friday, July 31, 2009
A new neck
A few weeks ago, I built a "quick Tele". It was quick partly because I used a pre-built (Warmoth) neck that I'd bought second hand. It's a great little neck. Or rather, a great *huge* neck. It was a monster, and became uncomfortable to play pretty quickly.

Notice the lack of any shaping between the heel and the head of the neck.
Warmoth necks are not cheap, and this was a particularly not-cheap Warmoth neck. A nice (and large) chunk of birdseye maple with a rosewood board. But, being not-cheap didn't make it any more comfortable, so I decided to attack it with the rasps ...

I'm always just a little "conscious" that there's a truss rod channel somewhere in there, and if I cut through to it, then the neck is ruined.
But I took 3.5mm off the thickness, reducing it from 25mm to 21.5mm along the length of the neck. and carving the transition between neck and headstock to give it some more feel.
 The fret-rocker came in useful for making sure that the back of the neck was straight, and that my rasping didn't leave any bumps or dents in the profile. Got that right, and then out with the sandpaper, followed by some more sandpaper, and finishing off with some more sandpaper.
It actually needs quite a bit more time of sanding, oiling and sanding and oiling (etc), but it's starting to look - and feel - a whole lot better ...
 I'm qQuite pleased with that for a morning's work
Monday, July 20, 2009
Build you own guitar fret bender
Apparently, if you try to fit fretwire into frets without bending it first, the ends have a tendency to pop out of the frets. Even when you hammer it in really hard. And then add some superglue too.
The wonderful StewMac sell a fretwire bender, to bend the straight fretwire that they also sell. But they want $90 for it. Add shipping, and then ParcelFarce and the UK customs will add their bit, so it would probably cost the best part of £100 by the time it arrived. £100 seemed like a lot for a fretbender ... but the straight fretwire really didn't work so well.
So I made one.
With a little help from a design published a projectguitar.com ...
 And now I can transform straight fretwire into nicely bent fretwire.
One of the wheels is adjustable, which changes the degree of bend ... the first one was a little too tight, but the next lot should fit nicely into the fret slots, without too much hammering and superglue.


This is the first neck that I made, now de-fretted. As you can see, the frets are still pretty straight, more or less as they went in. All the hammering, clamping and supergluing didn't make a whole lot of difference. At least it was easy taking the frets out.
I'm now going to clean up the fretboard, re-profile the neck (it was a bit chunky) and then re-fret it ...
The cost of the bits came to a few ££s, so I just saved myself about £95.
And in future, my frets should stay there they need to stay without quite as much superglue.
Wednesday, June 3, 2009
Completion
This one didn't take long ...


... but still a bit longer than I'd hoped. I'd aimed to get this done over a long weekend, but good weather and a barbecue (=beer) intervened and caused a bit of a delay. I need to get some better natural light photos because the wood (bi-colour Ash) is nowhere near as brown/orange as these photos show it. It's much lighter.
I made the body to house some BareKnuckle "The Boss" pickups and a Warmoth birds-eye neck - I wanted a Tele as I've dismantled both of my previous home-build Teles (1 permanently, and 1 temporarily for a neck re-shape). The pickups are as good as you'd expect from near-£200 BKPs. The neck is quite chunky. I think I might leave this in open G tuning and use it as a chunky rhythm guitar for all those Stones tracks. Which I'd have to learn properly.
I also need to track down a chrome switch tip, 'cos the big black one is horrible!
I also need to track down a chrome switch tip, 'cos the big black one is horrible!
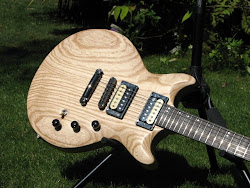
Saturday, May 30, 2009
Guitar building - progress
Another Tele build.
Using a piece of bi-coloured Ash. The grain pattern of this seems to be getting more distinct - and more attractive - the more that I work it. As you can see, all the routing is now done, and there's a strange (for a Tele!) shaped control cavity that's appeared ...

... I thought I might put some active electronics in this one, so I needed a bit more space in the control cavity than a standard Tele.

That's a piece of Purpleheart that I'm using as the cavity cover. It looks quite good (in natural light, not in the photo!) as a contrast against the Ash body. I'm hoping that once it's all been oiled, the constrast will be even better.
It's all sanded to 400 grit, so I should be able to get a coat of oil on it later today. Then tomorrow can be spent putting the hardware on it, soldering, and setting-up.
Wednesday, May 20, 2009
Another Tele
It's time for some more guitar building, although this one will be a slight cheat.
I recently bought some BareKnuckle pickups (not cheating yet) and a Warmoth pre-made birds-eye maple neck (oops, maybe a slight cheat with that one?). I got them both second hand for a price that just meant that I had to buy them. As the BKPs are a set of "The Boss" p'ups, I've now got to build a Tele to house them. Which is useful, because I've just dissassembled the other 2 Teles that I've built, one for reshapting (the neck), and the other for recycling (the fire).
For the new build, my original plan was to use some Swamp Ash that I also recently bought. But once I'd planed it and looked at the grain pattern, I decided that it was a little too plain.
So that will be capped with something, probably some maple) and used for something else in due course. I do have some fretboard-sized purpleheart which will certainly add a little colour to the ash/maple combination.


I'm happy with that join line though!

Plan (b) for the Tele build is to use some other Ash - this is bi-coloured Ash - for the Tele body. The photo below doesn't do justice to the wood as it's just been planed and routed. Once it's had a little shaping and some finishing, I'm hoping that the full colour of the wood will become more obvious.

Monday, May 18, 2009
The Kawai collection is complete?

The question mark at the end of the post title is deliberate ... just in case I stumble across another one somewhere, sometime.
From the left ...
KS-11-XL in violin sunburst.
KS-12-XL in natural (mine from new in c1979)
KS-10-Junior
KS-12-XL in black
KS-11-XL in natural - now fitted with a pair of PRS Dragon pickups.
Monday, April 27, 2009
Looks are deceptive!
If you look at the previous post, you'll notice that the Kawai appears to be a little less than fully original.
The bridge is certainly a replacement (although I did also manage to get the original unit, but the screws for the individual saddles have been stripped of thread) and I thought that one or other of the pickups was also non-original. All my other Kawais use the ivory-coloured open coil humbuckers, so my betting was that the black p'up was a replacement.
So, as it's non-original already, I thought I'd replace the Kawai's p'ups with a set of PRS Dragon p'up that I've got sat here, unused.
I carefully unsoldered the existing wiring, carefully unscrewed the existing p'ups, and took them both out. Turned them over to see what the black one actually was ... and it was stamped "Mighty Mite Inc" - exactly the same as the ivory p'up, and a standard fitment on those Kawai guitars.
So, for some reason, this guitar shipped with 2 different colour pick-ups.
Think I'll still replace them though. I prefer things to look balanced!
Tuesday, March 3, 2009
Kawai Guitars
I'm thinking about setting up a separate informational website just for the Kawai guitars. There is absolutely no information available on them on the www, and Kawai in Japan have no information either (I know, because I asked them!).
I'm not a great fan of the Teisco-by-Kawai guitars of the 60s & 70s - the strange shaped ones with lots of switches and too many pickups. But I really do like the late 70s ranges.
So, I thought I'd ask here, just in case there's anyone else who stumbles across this blog whilst searching for any info on Kawai guitars, to contact me if you've got any of the following models, or any information about any of the following models ...
KS-10-Junior, KS-10-XL, KS-11-Junior, KS-11-XL, KS-12-Junior, KS-12-XL, Moonsault.
In fact, perhaps any of the non-Teisco Kawai guitars ... I think there are a few designs which could be described as "inspired by Alembic" - the F1 model and others - which were also around in the late 70s/80s.
This is a real longshot, but if anyone involved in the production, export/import or distribution of those guitars stumbles across the blog ... please get in touch. There can't be many worthwhile subjects which isn't covered by a www site (and perhaps there are way too many non-worthwhile sites), so perhaps I can add some value to the www ...
Sunday, February 22, 2009
Another Kawai ...

Earlier this week a very helpful and observant reader-of-the-blog left me a message to say that he'd seen a Kawai guitar in his local music shop. This is a pic of that guitar.
I phoned the shop and spoke with the very helpful owner, and the deal was done. On Friday, the guitar arrived. It's a Kawai KS-11-XL, in natural finish. A 1-piece mahogany body, 3 piece mahogany neck with a maple cap. It's in "not bad" condition for it's age. The neck pick-up is non-original, as is the bridge (though I have the original Badass bridge too). It plays brilliantly though, and the various dings and scratches are only skin-deep - the construction is still sound.
This one makes it 4 Kawais in my little family ... still interested in hearing from anyone who's got any of the KS-10, KS-11 or KS-12 models though ...
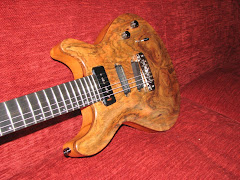
It's done!
It feels like this one has taken ages, but it's actually only a couple of months. Probably feels like longer because I've been desperate to play it!
It's finally all together, all wired, and all set-up. Thanks for assistance with the set-up go to Dr Robert (he of Guitarist magazine fame as well as many other roles!)


Based, not very loosely, on the Yamaha SG2000, with a couple of SD HotRails. It's a weighty guitar, and quite a chunky one too, but that all goes to add to the power of the sound.
The neck join is quite chunky too, but it doesn't stop access to the dusty end and it ensure a really good solid join between the neck and body.

We probably spent most set-up time cutting the nut - which surprised me, as I thought I'd already done that bit of work. Well, I had done it, but not quite as well as it should be done. I also now know how to repair a cut-too-deep with a little dab of super glue.
This one is going on the "play often" pile ...
Sunday, February 15, 2009
I'm building another cheapo ...
The people at the MusicRadar forum decided to do another £100 challenge. The challenge is to spend no more than £100, take no more than 1 month, and create a guitar. That might mean modding an existing old wreck, or building something from scratch.
Last year, I built one from scratch - a Cherry Tele - but it really wasn't that good. I had decided to take it apart and scrap it (or re-use the parts in another build sometime). But then this year's challenge came along, and I thought I'd try modding my build of last year.
The progress of that build will be blogged on my other blog (strangely enough, called the £100 guitar challenge!) and I'll be doing even less here for the next few weeks.
That guitar in the last post ... is all finished now! So, I'll post some final pics soonish.
Subscribe to:
Posts (Atom)


