You're welcome to leave comments for any of the posts (click on the little pencil icon at the end of a post), or contact me directly at tonysguitarblog@googlemail.com

Wednesday, December 31, 2008

Finally, the latest guitar is almost finished

If you've read the posts below, you'll remember that I did another make-a-guitar course in November. This course was less focused on a "make-a-guitar" and more focused on "learn-how-to-make-a-guitar".

So, the guitar wasn't finished in the 5 days, but I learned a lot more tips and techniques, and 101 (useful) things you can do with a router.

It's only with the Christmas break that I've had the time to do some more work on the guitar, and it's still not 1oo% finished, but it's reached a stage of finished-ness that I can share here ...


The wiring is now 95% done, the set-up work is partly done. I've just dis-assembled it to put another coat or two of oil on the body. And it looked so stunning, that I thought I'd take a couple of quick pics and post them here.
For anyone interested ... the 2 pickups are both Seymour Duncan P-Rails. Each mini-toggle switches between single coil, humbucker and P90 for each pickup. There's then a standard 3-way pick-up selector switch, a tone and vol, and a varitone switch (which will go where the spare hole is and is the outstanding 5% of the wiring work).
That works out to a lot (a very lot) of tone options from this one guitar.
The bit that I'm happiest with is the neck/body join, which you can't see in the pics above. So I'll post some more pics when it's all back together in a couple of days time.

Saturday, November 22, 2008

DIY fret press

I know that you can do the fretting with a hammer ... but using a fret press is so much neater and quieter. And safer on the fingertips.

Unfortunately, StewMac's fret press is a silly number of $$s (165 of them, plus shipping, plus duty, plus VAT, plus ParcelFarce handling fee), which adds up to quite a silly number of ££s with the current exchange rate. So I've been managing without one.

But the fret press cauls are a lot cheaper ($40), so I'd added one to my last order, thinking that maybe I'd be able to come up with a way of using it without the whole press system.

Ages ago I'd bought a cheapo cheapo drill stand. I think it was £5. I hadn't done much with it ... but thought "it might come in useful" one day.


And it did - it came in very useful ... there's rather's a big clue in this next photo ...


On the right is the $40 fret press caul, with a standard 12" radius insert, just perfect for fretting 12" radius necks! On the left is a piece of nylon, after it had been machined and drilled on my neighbour's lathe. I never knew he had a lathe. But then I never realised what you could do with one either!

Lookee what we made ...

One DiY fret press system. StewMac price $165 which would have added up to about £120 with all the fees. Cost of mine ... about £30!

Sunday, October 12, 2008

Here are the pics of the caps

I'm going to use one of these on the next guitar course. But which one?

a. bicoloured maple

b. maple burr


c. quilted maple. This piece is about 10mm thick, so will take quite a lot of carving to shape the top.

d. spalted maple. Very solid (for a spalted piece)

e. or ... walnut ...

Decisions, decisions, decisions!

November will be fun

I've had no time to do any building in my own workshop, but I'm taking a long weekend in November to head off to Walesland to the workshops of Mr Neil Morgan, where he'll guide my attempts at another self-build. I'm hoping to pick up another set of tips, tricks and techniques from Neil, as well as to come away with another guitar.

I'm planning on building a double cutaway, twin pickup guitar, along the lines of the classic Yamaha SG 2000s, similar to my first Bailey build.

The body will be mahogany, the neck will be either mahogany or maple. Fretboard may be ebony or maple.

The pickups arrived from the US. If I'd bought them a couple of months ago (£1 = $2.10) and if they'd managed to sneak into the country under the radar of customs, then they would have been a bargain. As it was, they were still cheaper than I could get them in the UK. For anyone that's not seen/heard the P-Rails before - check out Seymour Duncan's website. They're a combined P90 & single coil in a humbucker sized pickup, with all sorts of clever wiring options.

I'm now left with a choice of caps ... walnut or maple ... but the maple could be quilted, bi-colour, burr or spalted ... I'll get some pics of those posted later

Sunday, October 5, 2008

Still no building ...

Still no building progress to report, but I have been busily adding to the stocks of materials and parts, so that when I finish working I'll be able to get building again. My current piece of work was due to end last week, but it's been extended towards the end of the year. Sort of a good news (money) - bad news (no guitar time) situation.

I've just bought a couple of stunning looking tops/caps from my "usual" supplier, and a set of Seymour Duncan P-Rails, which I'll be using next month ... read on!

Having done the Bailey build-your-own course twice, next month I'll be going to a new course, just set up by Neil Morgan. There are no details of his course on his website (http://www.morgancustomguitars.co.uk/) only pics of his stunning guitars, but I'm hoping and expecting to learn some new tips & tricks. Hopefully I'll get time to put them into practice before the year's out. This is only the second time that Neil has run the course, but having spoken to the people who completed course #1, and seen the guitars that they produced, my hopes and expections are high!

As long as I can find internet access whilst I'm on the course, I'll add progress pics here.

Sunday, August 17, 2008

Where did that time go?

Anyone who's looked in here over the last couple of months might have wondered whether I'd given up guitar building ...

The answer is definitely "no", but equally definitely that I've had no time to make any progress over the last few weeks.

In fact, I think that I've found the problem with guitar building as a hobby ... it takes too much time, and doesn't fit too well around "work". At least, it doesn't fit around the sort of work that I do. I need a holiday ... maybe at the end of the month ... then I can get back to the serious stuff of making guitars ;-)

Sunday, July 13, 2008

and finally ...

This one has been more delayed than a National Express East Anglia train out of Liverpool Street on a Friday evening.

Or - thinking about it - just about any other evening too.

Finally, 'tis done ... I thinline-Tele-alikey thingy. Cherry body, with a (bookmatched no less!) Cherry top. Mahogany neck and a Wenge fingerboard. I got a bit adventurous with this one - see the mahogany inlay around the soundholes on the body, and the cherry inlay on the headstock. I think it works ...

Pickups are "AXL by EMG", just because they were cheap on eBay. Other bits and pieces from Keith at Axetec.


There's a bit of finishing off still to do. When I put it all together, I had to take 2mm off the heel of the neck to get the action right. I've not re-oiled that area yet, which is the light area that you can see in the pic above.
Apart from that, I'm fairly happy with it. Quite a few firsts in this one for me ... the first time that I've used a cap, the first time that I've chambered a body, the first neck that I've made from scratch ... it's a lot different when you're doing it all on your own rather than on a course somewhere - it takes a lot longer, and you have to work out for yourself how to fix all the little "features" that appear.
Now, what's next ...

Thursday, June 26, 2008

Necks

Right ... think I'll make me some neck blanks ...


Reading left to right, that's 3x sycamore, 4x sapele/mahogany, 2x walnut, 1x maple. That's a thick piece of maple too.

The plan is to make up some laminated 3 piece neck blanks ... sycamore-walnut-sycamore, sapele-maple-sapele ... that sort of thing. If I get really adventurous, I may try adding some veneer layers between the main pieces of wood too ... but I'll concentrate on getting the basic blanks right first.

Should yield me 40-odd blanks with some careful cutting, thicknessing and planing.

Will also yield me enough wood shavings to keep the wood fire going for a few nights.

DHL / StewMac - AMAZING service!

Decided I needed a few more bits and pieces (about $800 worth as it turned out). Learning from my past mistakes with eBay scummers, I decided to go back to StewMac to buy those bits and pieces. OK, so StewMac is a bit more expensive, but you can't fault the range of stuff that they stock, the quality or their totally amazing service.

I've used them once before, and was pleasantly surprised at the speedy service that time, but I always wondered if maybe that was a 1-off, that I just got lucky with that first order.

I hit the "buy" button sometime on Monday evening, and by Wednesday lunchtime the box had arrived ...


That is just amazingly good. Less than 48 hours to get a box of all sorts of bits and pieces picked, packed, shipped and delivered, from somewhere in the middle of the US, to me in the middle of nowhere in the UK.

It takes longer for the UK parcel delivery industry to get something from one side of the this country to another, whereas DHL deliver from a different continent, with a tracking system that lets you see where the parcel is for every step of the way.

Top marks to StewMac, and top marks to DHL. I'm noy buying my guitar stuff from anywhere else in future.

Wednesday, June 25, 2008

Put it to the vote ...

... here:

http://projectguitar.ibforums.com/index.php?showtopic=36048

Someone suggested that build #2 should be submitted to the "Guitar of the Month" challenge on the Project Guitar forum ... so I have done!

But, being something of a numpty, I managed to waste my vote (by opting just to look at the vote scores and submit a "null vote", d'oh), so I'll not be voting for my own build, but in case anyone else wants to ... the link is above ;-)

Saturday, June 21, 2008

A pause ...

There's been something of a pause in the build of my thinline Tele-alike ... it's done apart from finishing the fretting properly.

I thought I'd get some decent tools to do the job properly (as it looks like I'll be repeating the job on a few builds in the future!), but rather than buying from a good, reliable, trusted source, I thought I'd venture into the the unknown of eBay.

Now, eBay is great from many perspectives, and I've used it successfully many times. But it's also great for scammers and rip-off merchants. After 3 weeks of waiting for my fretting tools to arrive (from the US), after emailing the seller without any response, I finally got fed up and informed them that I'd raise a Paypal dispute. Whereupon they replied (!) with a dispatch note.

Have they really sent anything? Have they sent what I bought and paid for 3 weeks ago? Will the tools be of decent quality if/when they arrive? Am I just another poor sucker who's been ripped off by an anonymous scam artist?

Such questions and excitement is all part of the eBay experience ...

Next time I'll buy from StewMac again. Their prices may be higher, but the quality and service can't be faulted.

Friday, June 13, 2008

Quick Pics

Here's the new arrival ...


And here it is with the rest of its family ...


Found the Kawai!

This isn't really about guitar-building, but it's still about guitars so I'll share it anyway ...

Finally, after years of searching, I've finally managed to track down a Kawai KS-11-XL. Actually, the seller tracked me down from the link on this blog!

What's a Kawai KS-11-XL you may ask ...

One of the Made-in-Japan quality guitars from the late 70's. This is an original Kawai design rather than the more common jap LP/Strat copies, and is a higher-end guitar, comparable in many ways to the Yamaha SGs of the same era ... which puts it higher up the quality and sound scale than many of the more famous US-made guitars from the late 70's. In my opinion, of course!

Solid mahogany body with a curved maple top, 3-piece set mahogany neck, double cutaway design, twin HBs, Badass bridge.

I bought the "top end" model (KS-12-XL) back in the late 70's (thanks, Tim Gentle Music!), and for many years it was my only or main guitar. I still have it. I found the low-end model (KS-10) on eBay a few years ago, and it was a "genuine eBay bargain" - not a phrase that you hear that often. I'd missed an immaculate KS-11-XL on eBay before that, and am still kicking myself for that. If the buyer ever finds this blog ... contact me!

So when Matt contacted me through this blog, telling me about his KS-11-XL, I was slightly more than happy, and a deal was done. Guitar arrived yesterday and it's in amazingly good condition for a nearly 30-year old guitar. It's the violin sunburst finish rather than the natural, which is why I'd still be interested in hearing about any natural-finish examples ... if any still exist!

Pics to follow ...

Saturday, June 7, 2008

No guitar building today ...

... because I spent too much time here last night ...
There are just some things that a man has to do ... apart from guitar building ... and sampling the odd glass or two of a few different varieties of freshly brewed beer is one of those things. But when I woke up this morning, I realised that someone had been hitting my head with a hammer all night. And they were still inside my head, still busy with the hammer.

So no guitar building today or this weekend ... but it was a worthwhile sacrifice!

Saturday, May 31, 2008

Oiled

Here's a quick shot of the body and neck after 3 coats of plain finishing oil. The oil has really brought out the grain of the wood, and emphasised the contrast between the cherry and the piece of mahogany inset into the body around the sound holes - that's come out better than I'd hoped.


Before I started working with it, I'd not appreciated the beauty of cherry as a wood. You get some idea of the colour variation in this photo ...

Mahogany has never been one of my favourite woods, but the neck also looks a lot better with a few coats of oil on it ...


You can also see a small "nick" in the bridge pickup cavity - on the side closest to the control cavity. The pickup that I'm going to use (EMG) has a slightly different shape to the standard pickup ... but after 5mins with the chisel, it now fits into the cavity! The minor alteration won't be visible because it's all underneath the bridge piece, but it shows that you can't assume anything!

Thursday, May 29, 2008

Progress

At last, I've got on with build #2. I think the thought of fretting was working on my sub-conscious and making me delay it. I don't know why I thought it would be difficult, 'cos it was quite straightforward. The frets are all seated nicely in place and look fairly level. I'm waiting for some fret files to arrive from the US, so I can't finish the job just yet.


As you can see, all the body holes are drilled, and it's also sanded ready for finishing. I'm just going to oil this one. The "soundholes" in the body have a piece of mahogany (from the neck) inlaid around them ... so I've reversed the design by inlaying a piece of cherry into the headstock.

I'm quite pleased with the way that both of those worked out ... it could have been a horrible mess! And you may think that it is ...

Wednesday, May 28, 2008

A lot more useful than planks of wood ...

... is a pile of body blanks and caps ready for turning into guitars!

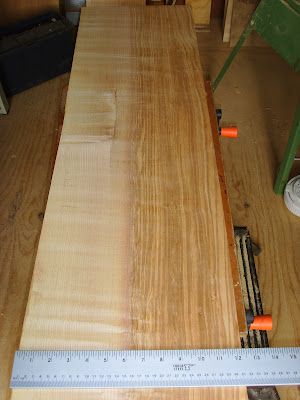
The large plank (see below) of olive ash is now turned into 1 body blank, and - potentially - a couple of neck blanks. With some careful cutting, the smaller of the planks will yield another body blank, with some interesting colour variation.


and this is the neck blanks (or maybe 2). As you can almost see, the grain is running vertical to the larger faces - ie it's quarter sawn. Perfect for guitar necks!

Tuesday, May 20, 2008

Wood

This is probably a little sad, but I got really excited this morning when Mr TNT delivered a large and heavy (30kgs) package, full of bits of wood. Yup, bits of wood is now enough to get me excited.

First, a couple of sets of walnut caps. These look pretty good in the photos (IMHO), but look way way better in real life, and that's before they've been oiled and finished. I think these are going to look stunning in a couple of months when they're part of a newly built guitar ...


Also in the parcel were a couple of fairly large pieces of Olive Ash - ie Ash with a greeny tinge to it. A full 2" thick, and plenty enough for a couple of guitar bodies, and may be a neck blank or two as well ... does Ash make for good necks?


Those 2" planks were originally 3" thick, so my friendly wood supplier person cut off the extra 1", and then turned that into some bookmatched pieces ... looks better-than-good to me. I do realise that I now have lots of potential caps, and less-than-lots of potential bodies, so I'm on the lookout for some more body wood!
As well as unwrapping parcels of wood, and photographing the contents, I also spent a little time preparing a template for my intended next build - a LP Junior Doublecut - and once I'd finished the template, I thought I might as well cut out the body blank prepared earlier ... that's a quilted maple cap hiding a hefty chunk of Korina underneath ...
I've been offered a set of Lace Sensor P90's - which I'm probably going to grab - to fit into this one.

Sunday, May 18, 2008

Finally, a little progress

It seems like I've had no time for guitar-making recently. But I did manage to get a few hours in the workshop today, so there's been a little progress.

First job was to drill the holes for, and fix in place, the (Vietnamese) mother-of-pearl fret markers. It looks a little messy where the superglue spilled out of the holes, but it dried eventually. I did have a can of glue accelerator somewhere ... but can I find it ??


And here's the re-sanded dots-in-place fretboard:


Whilst holding the neck in different positions as I was fitting the markers, I decided that it felt "chunky" - too chunky. It's not that I have small hands, but the neck felt a bit on the big side, so having already sanded it once to a reasonbly smooth finish, I decided to waste all of that work and re-shape the neck. There goes an hour or two ... but it feels better now.
And here's the body as it is - sanded to 180 grit all round, so it's getting there.

I don't like the traditional "f-hole" shape, so I've done something different. That's a piece of Sapele/Mahogany inset into the body. I'll drill the holes through to the sound cavity once I've finished sanding the rest of the body, otherwise the sound cavity will just fill up with sawdust.

Still plenty to do before I can plug this one in, but at least there's been some progress today.

Friday, May 16, 2008

Where does time go?

It seems that I've done nothing on this guitar build for ages.

That's because I really haven't done a huge amount.

I suppose that's what happens with a "hobby" ... sometimes you have time for it (or can make the time), othertimes other priorities take up the time - like "work" or making some dog agility jumps to support my wife's hobby!

Hopefully, this weekend will see guitar-making some progress.

My fretboard markers have arrived (from a Vietnamese eBayer) so I can drill and glue those in, which means I can then start on fretting the neck - which I've also been happy to put off because my level of confidence is less than high ...

I'm also starting to think about build #3, which I'm pretty sure will be a LP junior doublecut design, perhaps with a pair of P90s.

And I've been hunting out some new wood supplies. Nothing fancy, but a change from working with cherry, cherry, or cherry.

So, if all goes to the sort-of-plan that I have, I'll be posting some decent progress updates and pics over the next few days ...

Sunday, May 4, 2008

Yesterday's work ...

The neck / body join looks good and tight ... although the neck is about 2mm too high. I realised that only after I'd spent 45mins getting the join as tight as I could. Next job - take 2mm off the neck pocket and check it again.

Here's the routing done - always feels like a major milestone because it means that the neck join is OK (so that I can measure exactly where the bridge needs to go), and also means that most of the "destructive" work is now also done - ie not so much more sawdust to be created from this piece of wood.
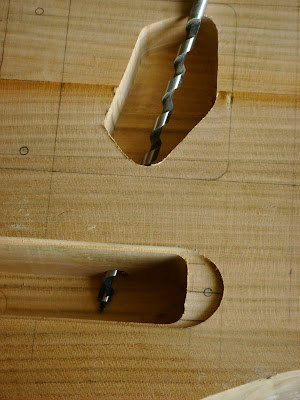
This next step is just about getting the angles right. You really need 2 pairs of eyes to check both the horizontal AND the vertical alignment as you drill.


Saturday, May 3, 2008

A whole week

That's a week since my last update ... where did that week go to?

I left last week's thrilling episode with the body and cap glued and clamped together. As the photo below shows, the clamps are off, and the body and cap are fixed together successfully. There's a bit of a glue line down the centre of the cap, but I'm expected (hoping) that the line will either disappear when I sand the front down, or will disappear when I oil it, if the sanding doesn't work. Time will tell ...
One of my (expensive) acquisitions from StewMac is this sanding beam. I've fixed some 60 grit paper to the underside, and spent about 30mins sanding the fretboard ... The beam has a 12deg radius shaped into the sanding side, so this also shapes the fretboard. Takes a long time though ...
One of the scariest bits of guitar making (to me at least) is shaping the neck. Here's the start position, with some guidelines drawn on ...
And after a few minutes attacking it with a rasp, here's a rough shaped neck. As well as being one of the scariest parts of the process, it's also one of the most rewarding. After some more attention with lots of sandpaper, the neck has taken shape, and pickup it up and feeling the smooth shape of the sanded neck is definitely one of the high points of the process:
And here it is, sanded.

Saturday, April 26, 2008

It's been a bit too hot for too much manual work in the workshop ... but I managed to get some more work done.

There's the truss rod fillet glued in place, and almost planed flush with the surface of the neck.
And, after being clamped in place for a few hours, here's the neck with the fretboard now fixed in place too.

That's the end of the easy work on the neck now. The rest of it is hard work - shaping the back of the neck, radiusing the fretboard, and getting the frets installed properly ..

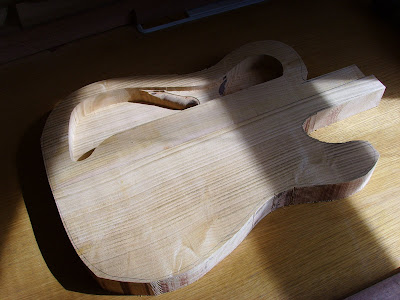
Here's the body. I decided to hollow out a bit more that was shown on the template ..

And here is the top, glued and clamped to the body. I'm going to leave it like that overnight to make sure that the glue is absolutely, completely, fully and totally set ...

Thursday, April 24, 2008

Busy day yesterday ...

Mmmm ... looks a bit thin for a guitar body ...
That's actually a bookmatched cherry cap. I managed to cut one of my pieces of cherry in half (lengthways) with a bandsaw, and then thickness both parts down to just under 10mm. Plenty thick enough for a cap, and thick enough for a bit of shaping on the cap too.
Can you guess what it's going to be yet ...
This might not be the standard shaped chamber for a thinline Tele, but I don't see why it wouldn't work just as well. Plus, I wanted to leave plenty of the body there to glue the cap to. This is my first attempt at a build like this, so I'm playing as safe as possible.

A slight cheat here, in that I'm using a bought-in neck blank. Sapele (not a favourite wood of mine). Still, the faces all needed planing before use, so it's not a complete cheat.

Here the truss rod slot has been cut, and the truss rod fits in nicely


Then you saw it, now you don't ... a fillet covering the truss rod in its slot. First job of today will be to glue the fillet in place, then to plane it down smooth with the face of the neck.

And when it's all planed and smooth, I'll cut out the neck shape, before fixing the fretboard on top. And one fretboard, slotted and ready to go.

It was quite a busy day in the workshop yesterday. Too much beer (is that possible?) combined with a half a bottle of red wine last night has resulted in a slightly sore head this morning ... so today's progress will be limited.