You're welcome to leave comments for any of the posts (click on the little pencil icon at the end of a post), or contact me directly at tonysguitarblog@googlemail.com

Saturday, April 26, 2008

It's been a bit too hot for too much manual work in the workshop ... but I managed to get some more work done.

There's the truss rod fillet glued in place, and almost planed flush with the surface of the neck.
And, after being clamped in place for a few hours, here's the neck with the fretboard now fixed in place too.

That's the end of the easy work on the neck now. The rest of it is hard work - shaping the back of the neck, radiusing the fretboard, and getting the frets installed properly ..

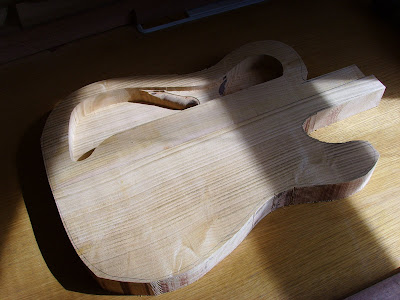
Here's the body. I decided to hollow out a bit more that was shown on the template ..

And here is the top, glued and clamped to the body. I'm going to leave it like that overnight to make sure that the glue is absolutely, completely, fully and totally set ...

Thursday, April 24, 2008

Busy day yesterday ...

Mmmm ... looks a bit thin for a guitar body ...
That's actually a bookmatched cherry cap. I managed to cut one of my pieces of cherry in half (lengthways) with a bandsaw, and then thickness both parts down to just under 10mm. Plenty thick enough for a cap, and thick enough for a bit of shaping on the cap too.
Can you guess what it's going to be yet ...
This might not be the standard shaped chamber for a thinline Tele, but I don't see why it wouldn't work just as well. Plus, I wanted to leave plenty of the body there to glue the cap to. This is my first attempt at a build like this, so I'm playing as safe as possible.

A slight cheat here, in that I'm using a bought-in neck blank. Sapele (not a favourite wood of mine). Still, the faces all needed planing before use, so it's not a complete cheat.

Here the truss rod slot has been cut, and the truss rod fits in nicely


Then you saw it, now you don't ... a fillet covering the truss rod in its slot. First job of today will be to glue the fillet in place, then to plane it down smooth with the face of the neck.

And when it's all planed and smooth, I'll cut out the neck shape, before fixing the fretboard on top. And one fretboard, slotted and ready to go.

It was quite a busy day in the workshop yesterday. Too much beer (is that possible?) combined with a half a bottle of red wine last night has resulted in a slightly sore head this morning ... so today's progress will be limited.

Wednesday, April 23, 2008

What's a thicknesser for?

The answer to the question is - obviously - "it's for making a mess in the garden". I took this pic about half way through preparing the body from that piece of cherry (you can see a the edge piece with the bark still on it, propped up against the open door). It leaves a really smooth finish, nice and even, and saves a huge amount of time with the hand plane and sandpaper!

Build #2 starts here

OK, here's the raw material:


That's another piece of cherry plank, a sapele (mahogany-ish) neck blank, and (I think) a piece of Wenge for the fretboard. Yes, there's way too much cherry there for just one body, but that piece at the front has a number of "features" in it that make it unsuitable for the body, so I have other plans for it!

What did I learn on the course?

I will be the first to admit, publically, for all to read, that I realise that building a guitar under the watchful eye of Mark Bailey is likely to lead to a better result than building one without his help, advice, guidance and repair expertise!

But, at least I've tried once, and will try again and again. If I get just a little bit better, if I learn just a couple new tricks and techniques each time, then I'll be happy.

If guitar-building is a bug, then I've got it. Watching a perfectly playable instrument take shape in your own hands is a far more satisfying experience than walking into a shop and just buying one from a Chinese production line. And how much more environmentally responsible must it be? (OK, that's a weak excuse).

The story of my first completely self-build is told on the £100 guitar challenge blog (just click the underlined link to read all about it).

Rather than abandoning this blog - which was originally set-up to blog the 5 day course - I thought I'd develop it to tell the stories of my subsequent builds.

Sunday, April 20, 2008

The rest of the pics are now on-line in a photo gallery here.